
How to See and Photograph Comet Neowise
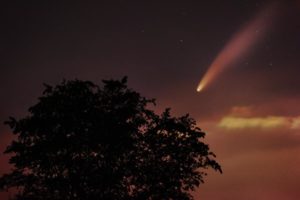
Above Image: Comet Neowise photographed from the Maryland countryside.
Taken with a Nikon D810 using a Sigma 150-600mm lens at 390 mm set to f/6.0, ISO 3200.
Ninety-three 3-second exposures were stacked with Sequator before processing.
Introduction
Comet C/2020 F3 (Neowise) is the brightest comet since Hale-Bopp in 1997. This unexpected night-sky spectacle became visible in the morning hours before dawn around early to mid July, and is now more readily seen in the evening sky. Although not a “great” comet, its nucleus and tail are visible to the naked eye from areas of sufficiently low light pollution, and even more details can be revealed with binoculars or with long exposures using a camera. The brightness of the comet is expected to diminish as it moves away from the sun, however it is also getting closer to earth, with closest approach being on July 23rd at about 0.69 AU (compared to 0.77 AU a week earlier). Also, it will get higher in the sky which will make it appear brighter in contrast to the darker skies above the horizon. The higher an object is in the sky, the less atmosphere the light travels through, meaning there is less attenuation and dimming of the light. These effects will compete with one another, and therefore the apparent brightness prior to July 23rd may only decrease slowly during this period. Therefore, I recommend going out on a clear night before then, preferably sooner rather than later. I have observed the comet on several occasions from my suburban location in central Maryland, and below I share some viewing and photography tips based on these experiences.
Finding the Comet
To help spot the comet, Table 1 lists the altitude (height above the horizon) and azimuth (directional bearing) for the comet about an hour and half after sunset (10 PM local EST in Maryland). Also shown is the time at which the comet sets below the horizon.
| Date | Altitude (degrees) | Azimuth (degrees) | Set Time |
| 7/17 | 13 | 323 | 12:42 AM |
| 7/18 | 15 | 320 | 12:58 AM |
| 7/19 | 17 | 318 | 1:08 AM |
| 7/20 | 19 | 315 | 1:13 AM |
| 7/21 | 20 | 313 | 1:15 AM |
| 7/22 | 22 | 310 | 1:14 AM |
| 7/23 | 23 | 307 | 1:13 AM |
| 7/24 | 25 | 304 | 1:11 AM |
| 7/25 | 26 | 301 | 1:08 AM |
Table 1: A table of the altitude and azimuth of the comet at 10 PM EST from a location in Maryland, as well as the time at which it sets below the horizon.
Binoculars are recommended for spotting the comet, although it may be possible to see with your naked eye. From my discussions with others who have tried to observe the comet in our suburban area, it seems that the majority are unable to see it without visual aid. However, an enhanced viewing experience will be possible in dark areas with low light pollution. I am personally able to see it quite clearly during the prime viewing period of approximately an hour and half after sunset. During this time, the sky is at its darkest, while the comet is still relatively high above the haze and light pollution nearer the horizon. One way to tell if it is dark enough is if the horizon no longer has any light from the setting sun. If it looks like it would at the darkest hours of the night, then it should be dark enough out to spot the comet provided you are in an area that is not too heavily light polluted.
I have observed the comet in the pre-dawn sky at approximately 4:30 AM local time on July 12th, when it was at an altitude of about 7 degrees. It was no longer visible to the naked eye a little after 5 AM, which is 50 minutes before sunrise. However, my camera was still able to capture it moderately well. On another occasion I spotting it in the evening around 9:30 PM, about an hour after sunset, and it was visible by eye until a little after 10 PM. Again it was visible on the back of my camera until much later, even when it was only a degree or so from the horizon. More recently, I saw the comet around 10 pm even though there were some thin clouds partially obstructing my view. To my eye, the tail appeared much larger than it did several days before, although the nucleus was, if anything, dimmer.
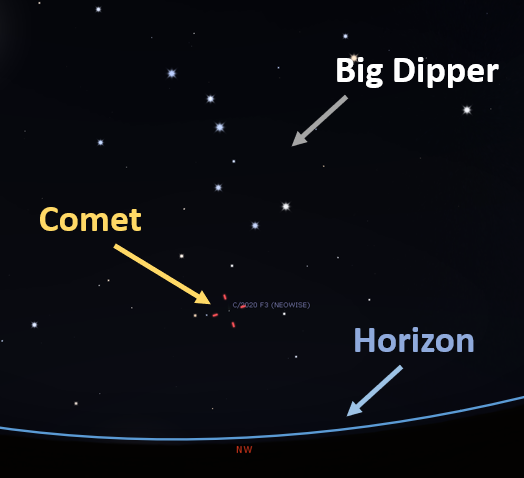
A helpful way to determine the height of the comet is to outstretch your arm and make a fist with the bottom touching the horizon. The width of your fist at arms length is approximately 10 degrees. Many people tend to underestimate how high the comet is even at just 10 degrees altitude. To find the direction of the comet, look beneath the Big Dipper (see the example sky map in Illustration 1).
For a more precise method, the azimuth coordinates listed in the table above can be used to find the comet using a compass. If you have an Iphone, you likely already have a compass app that you can use to find the location of the comet’s azimuth bearing. A screen shot of what this looks like on my phone is shown in Illustration 2.
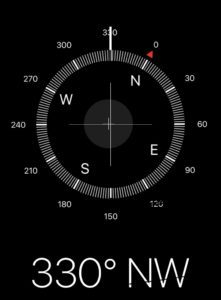
Rotate your phone until it reads the azimuth coordinates listed in the table above, then the white marker shown at the top of your phone points in the direction of the comet. You can use a conventional compass for this as well.
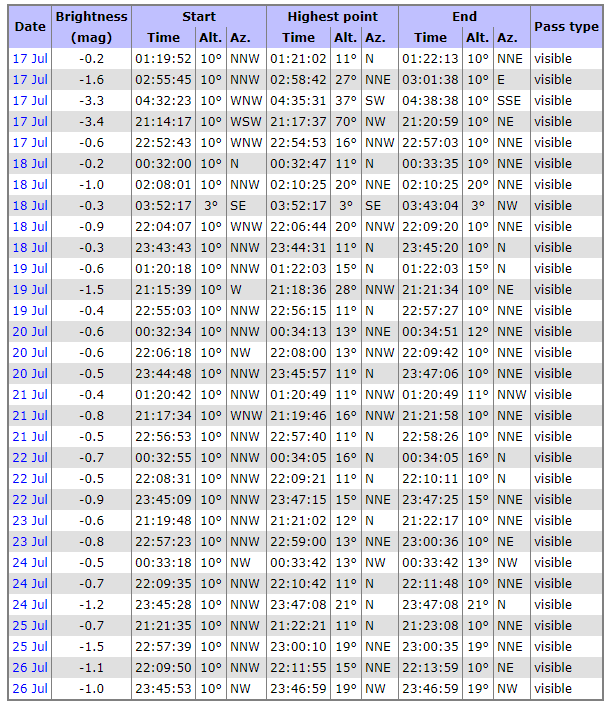
An additional observing tip: the international space station is flying over the east coast in the morning and evening hours over the next days. If you see a strikingly bright satellite (a steady, non-blinking light) moving across the sky, it might just be the ISS. Here is a link where you can find precise flyover times: https://www.heavens-above.com . For those of us near Sparks, Maryland, I list the visible flyover times in Table 2.
A final word of advice: don’t expect the comet to look anywhere nearly as bright as it does in many images shown online (including my own). I have included an image in Illustration 3 that shows more realistically how it appears to my eye at the prime viewing time.
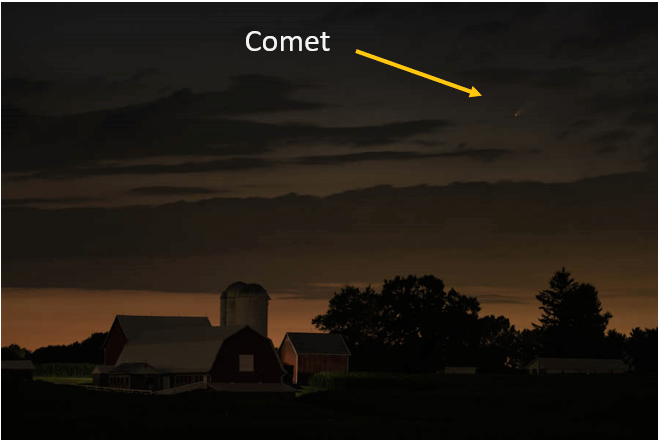
Illustration 3: A more true-to-eye portrayal of the comet.
To summarize:
- Look to the northwest about an hour and a half after sunset and about a fist and a half width from the horizon
- Use binoculars or a camera to see more detail and increase your odds of seeing the faint tail
Photography Tips
Here are my recommendations for camera setup and camera settings when capturing images of the comet based on my experiences.
Focal Length
The first consideration is how wide you wish to shoot. I have seen very nice images shot with a wide lens at 15-30 mm which includes a great amount of the landscape, making for a very captivating composition. However, my experience in more light polluted suburban areas is that the comet’s tail does not span much of the sky, and therefore does not show up well at such wide focal lengths. Instead, I tend to prefer using 100-400 mm focal lengths, depending on how much of the landscape I wish to include. Using this amount of magnification makes the brightest part of the comet fill more of the frame and, therefore, can produce an image with greater impact. In areas of darker skies, composing wider images may make for more captivating images and show more of the details of the comet’s spectacular tail.
Shutter Speed
For choosing a shutter speed, the ideal value is long enough such that you gather as much light as possible while not revealing the motion blur caused by the stars moving across the sky as the earth rotates. One effective method of accounting for this is to use a tracker mount, which follows the stars (and comet) as they move, therefore allowing for very long exposures. If you don’t use a tracker, you can take either a single exposure or stack multiple exposures. This latter approach reduces noise as if you were taking a longer exposure, and is generally the method I use when photographing night sky objects.
The focal length you choose will determine the shutter speed you use. Longer focal lengths will reveal more motion of the stars and hence require shorter exposure times. A rough rule of thumb is that the acceptable exposure time is about 20 seconds at 20 mm, and increases inversely proportionally to the focal length. So, for example, at 40 mm you will need to shoot 10 second exposures and at 400 mm you will only be able to expose for 1 second. This will vary depending on the resolution of your camera, your cameras crop factor, and the location of the objects in the sky. To determine the proper exposure time, take an image using this rule as an initial guide, then digitally zoom into a star in the image you captured. Increase the exposure if the stars are still round in appearance, or decrease it if you see star trails in the image. I have found that shooting the comet for 3 seconds at 200 mm gives reasonably acceptable star trails (see example blown-up image in Illustration 4).
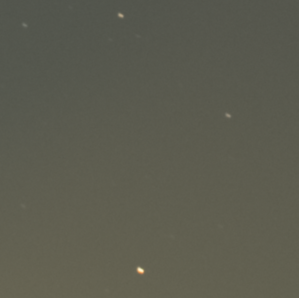
Illustration 4: Example of star trails caused by shooting a 3 second exposure at 200 mm. Shown is a 300×300 pixel crop of a 6100×4100 pixel image.
ISO
The next choice is the ISO, which is less important, but should be set to something that is low enough that the stars do not overexpose, therefore losing their color. Don’t be afraid if the image looks a bit dark. However, ideally the ISO should be set as high as you can to mitigate additional noise, although this is often a small effect for many cameras, especially top-end models.
Aperture
The last setting is the aperture, which should generally be set to the smallest value the lens allows to gather the most amount of light possible. The only exception may be for lenses that suffer from extreme vignetting, often at very low apertures such as f/1.8, when stopping down to f/2.8 can be beneficial.
Capturing Higher Quality Images
For stacking a series of images, one can set the camera to shoot a time-lapse. This can either be done using an intervelometer or it may be available in your camera menu. Alternatively, one can use a remote shutter release and manually capture a series of images. If you don’t have a remote shutter cable, set your camera on a short timer to allow for vibrations to die down. For additional precautions, use a mirror-up mode and front-curtain shutter if your camera has those options, and make sure you turn any vibration reduction off when the camera is on the tripod. Stacking can be done using software such as Deep-Sky-Stacker or Sequator. The latter is easier to use, and I find works very well. The number of images one should acquire depends on how noisy your single exposure images are and how much enhancing you will do in post-processing. For example, if each image is shot at ISO 1600, then stacking 16 images effectively reduces the noise to a level it would be had a single exposure been captured at ISO 100. This will produce an image with very low noise, however if you then increase the contrast in post-processing, the noise may show up again. So if you plan on doing quite a bit of editing, for example to bring out the subtle details in the comet’s tail, you will need to capture more frames. Keep in mind also that the signal-to-noise ratio, which is basically the value you care about when dealing with noise, decreases only as the square-root of the exposure time. Therefore, capturing a 4 times longer exposure only effectively reduced the noise by a factor of 2.
If you’re like me and seek to incorporate a landscape into the image, then there are a few ways one can go about this. If you are not worried too much about getting a noisy result, then of course you can shoot both the sky and the landscape in a single exposure. However, in order to achieve high quality, low-noise, results, there are a few methods one can use. One method is to shoot the landscape using a low ISO setting, such as 200, and capture a long exposure so that the dark areas (the shadows) in the image are not underexposed. One way to tell that you have a sufficiently long exposure is to check the histogram on your camera. The histogram shows a set of vertical bars, representing the number of pixels at each brightness value. The y-axis is the number of pixels, and the x-axis is the brightness, with the left being dark and the right being bright. If the display of vertical bars touch the left-hand-side of the graph, then you may want to increase your exposure time. Whether this is necessary depends on how much brightening you plan to do to the dark areas of the image. Also, if the dark areas of the image aren’t too severely underexposed, they can often be recovered in post-production, especially when shooting with cameras with full-frame or larger sensors.
A second method for capturing the landscape component of the image is to shoot multiple images and stack them, effectively giving the same result as taking one longer exposure. The benefit of this method over a single longer exposure is that one can eliminate frames in which a car light shines on the lens, or other issues arise that would ruin a single exposure. Also, if you are already shooting multiple images of the sky, you can use those same images to reduce the noise in the foreground. Sequator includes an option to stack both the sky and ground in one go. This often can work fine, but if not, you can stack the sky and landscape separately and blend them in photoshop. You can also turn your sequence of images into a time-lapse movie if you want.
An additional method is to gather more light in each image by using a longer lens with a larger diameter. For example, a 200 mm lens at f/2.8 has an effective light gathering ability 100 times greater than a 20 mm at f/2.8. Therefore, one could in theory shoot single exposures at 200 mm and stitch the images into a mosaic that has the equivalent amount of noise as an image shot at 20 mm at 100 times longer exposure. This is an extreme example, but in practice one might stitch a mosaic of perhaps 9 total images, three rows and three columns, overlapping each by about 20-30%. This would result in a field of view equivalent to a lens that is about half the focal length.
For more detailed information about night-sky photography, see Roger Clark’s website which contains a wealth of useful information: https://clarkvision.com/articles/nightscapes/
Another method is to shoot the landscape before it gets completely dark out, during the so-called “blue hour”, and then blend this with a separate image of the sky taken later in the night. If this doesn’t fit your taste, then I recommend going with one of the previous options. Even capturing a single image of lower-quality will still most likely look great when viewed online or when printed at small to moderate sizes.
A final tip: if you are having trouble focusing in the dark, try to manually focus on a very distant object in live-view, like a street lamp or building light, using the digital zoom to get a close view to make sure the object is sharp. Or, do the same with a bright star, adjusting the focus so that the star’s size is minimized.
To summarize:
- Use a shutter speed that is short enough so that the star’s motion is acceptably small.
- Set the aperture to its lowest value to gather the most light possible.
- Set the ISO to something just below a value that over-exposes the stars so that they maintain their natural color. Don’t worry too much if the images are a bit dark.
- Stack multiple exposures or use a tracker to mitigate noise for extra high quality images from which more detail can be extracted.